Soffit Mounting Control Room Monitors
Soffit Mounting Control Room Monitors
Soffit mounting often actually means flush mounted in the front wall. Sometimes the monitors are mounted higher up in a soffit but more often than not its directly in a vertical, or angled, front wall. The term has sort of become interchangeable.
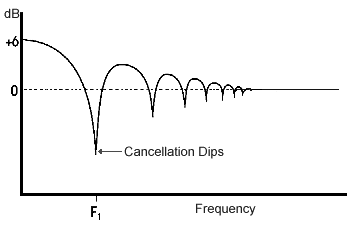
The frequency of the first dip can be calculated by measuring the distance of the speaker to the wall. Divide 340 (the speed of sound in metres) by four times the speaker distance and you will have the dip frequency. Obviously further cancellations will occur at increasing harmonic frequencies.

The frequency response dips caused by a wall reflection.
Speaker Basics
Speakers have two theoretically ideal working conditions. The first is if the speaker’s radiation space is into a full space (spherical radiation).
The second into a half space (hemi-spherical radiation).
To achieve ideal full space conditions the speaker needs to be small compared to the radiated wavelength. Because the speaker front baffle is small, the higher the frequency the smaller the radiation angle will be.
A small speaker baffle is not ideal because the diffraction effect of the edges causes slightly delayed reflections to be produced. This degrades the response and imaging of the system.
The Frequency Response Dip caused by a Reflection
Generally, in most rooms, free standing speakers are surrounded by walls/ceiling/floor that will generate reflections. These surfaces act as acoustical mirrors to the speaker’s radiation, enhancing or cancelling the direct sound. This depends on the phase difference between the reflection and the direct sound where you are sitting.
Generally, at lower frequencies, the reflected sound from the wall behind the speakers interferes with the direct sound. This is often in phase with the direct sound and causes deep peaks and troughs in the frequency response.
These effects, depending on the relative amplitude of the direct vs reflected sound, can be between 6dB and 20dB.
Moving the dip frequency
There are basically two ways to do this.
The first is to position the speakers far enough from the room boundaries to move the first order interference dip below the lower cut-off frequency of the speaker.
This can be a problem because, if you consider even 50Hz, the distance to the boundaries would need to be 1.7m which is often not practical in a small room.
The second method is to move the speaker as close to the wall as possible to decrease the delay time of this reflection relative to the direct sound.
This moves the interference dip to a higher frequency. Here the speaker’s own directivity reduces the rearward radiation and therefore the amplitude of the reflected sound.
When the speaker is mounted flush with the wall there is only direct radiation. Because of this effect the total sound power radiated into the room will gain up to 6dB compared to a freestanding loudspeaker at lower frequencies.
Flush Mounting Benefits
Flush mounting speakers into walls also has the advantage of eliminating unwanted secondary reflections from the speaker’s edges. This is because of the reduced diffraction effect so the frequency response and imaging is much more stable.
Most commercially available speakers are designed to deliver a flat frequency response when operated in the free field. If they are then flush mounted their frequency response will no longer be flat. It will usually have a bass boost of +4 to +6dB.
If the speaker does not have a built-in bass shelving control, you need to use a separate equaliser to correct this problem.
Correct Implementation
The speakers need to be mounted exactly flush with the front wall. There must not be any gaps or edges between the loudspeaker cabinet and the room wall.
Ideally the speakers should be floated on their mounts to decouple the speaker vibrations from the room structure. If they are tied directly to it then the walls, floor and ceiling will also radiate unwanted vibrations. This may, however, be a design intention.
Room Modes
A speaker mounted flush in the wall will tend to excite ALL the standing wave modes in a room. The only effective way to overcome this problem is to heavily damp the rear wall of the control room at low frequencies with low frequency absorption material.
As well as this article on soffit mounting control room monitors we also have an article on free standing studio monitor placement.
